

Getting started with Google Classroom
Google Classroom is a free online service that lets teachers and students easily share files with each other. Teachers can post assignments for students to complete and then grade them, all without having to print anything.
It also serves as a way of communicating. Teachers can post announcements and upcoming assignments, as well as email both students and their parents.
It relies heavily on the use of Google Drive, a free cloud-based file-sharing program. It allows teachers to use Google Docs, Google Forms, and many other Google services to create and store assignments.
Watch the video below to learn more about getting started with Google Classroom.
This tutorial is mainly a guide for teachers. It includes lessons on creating classes and assignments, grading, and communicating with students and parents.
How to access Google Classroom
Before you start using Google Classroom, you’ll need to make sure you’re signed in to your Google account. If you don’t have one, you can review our lesson on creating a Google account to get started.
Google Classroom can be accessed by visiting classroom.google.com. There’s also a mobile app that can be downloaded on both iPhone and Android devices.
The mobile app is great for accessing your classroom on the go, but you’ll probably have an easier time performing tasks like grading and creating assignments on a computer.
Creating a class
When you open Google Classroom, the first thing you’ll need to do is create a class. Click the Plus icon in the top-right corner, then select Create class.

This will bring up a dialog box asking if you’re planning on using Google Classroom at a school with students. Google Classroom requires schools to use G Suite for Education if their teachers plan to use it in their actual classrooms. This provides teachers and students with more privacy and security measures. If you’re using Google Classroom for your own personal use, you won’t need to worry about this.

You’ll then need to enter the name of your class. There’s also the option to enter a Section, Subject, and Room if you’re using Google Classroom in a school and want to include this information. When you’re done, click Create.

Navigating Google Classroom
Once you’ve created a class, you’ll be taken to that class’ page.
Click the buttons in the interactive below to learn more about the Google Classroom interface.

Adding students to your class via email
Once you’ve created your class, you’ll need to add your students to it. One method you can use is to invite students via email. To do this, you’ll first need to navigate to the People tab.

Click the Invite students icon.

This will bring up a menu where you can type your students’ various email addresses. Once you’ve added these, click Invite.

This will send an email to your students, with a link inviting them to join your online classroom.
Adding students with a class code
The second option for adding students to your class is using a class code. This is a short code that anyone can use to join your class if you provide them with it.
There are a couple places to access the class code, first click the Stream tab. Then, you find the class code within the class information section.

If you want to enlarge the code to show the class, you can click the four corners icon.

Another way to access the class code is to first click the Class settings icon in the top-right corner.

You’ll find the class code under the General section. From here, you can share your class code with your students with an invite link or a class code.

You’ll also see some options for teachers to secure their Google Classroom. Click the drop-down arrow next to Manage invite codes.

Within the Manage invite codes menu, you can select an option that works best for your class.
- Turned on: Students at any time can join your class if they have the current class code or invite link.
- Turn off: No one else can join the class because the invite code is off.
- Reset: Invite code is resetted to a new code. Students can still join, but they will need the new code or invite link. This won’t affect students who have already joined the class.
Setting up the Stream
The Stream is where students can see announcements and other posts from their teacher. There are settings applied to the Stream that give students the option to post and comment or only comment. To change these options, go to Class settings. Then, click the drop-down menu next to Stream. For this example, we’ll select Only teachers can post or comment. By selecting this option, teachers will have control over the information posted to the Stream.

Adjusting email notification settings
After creating a class, you can change how you are notified by students.
Click the Main Menu icon. A panel opens on the left side.

Then, click Settings.

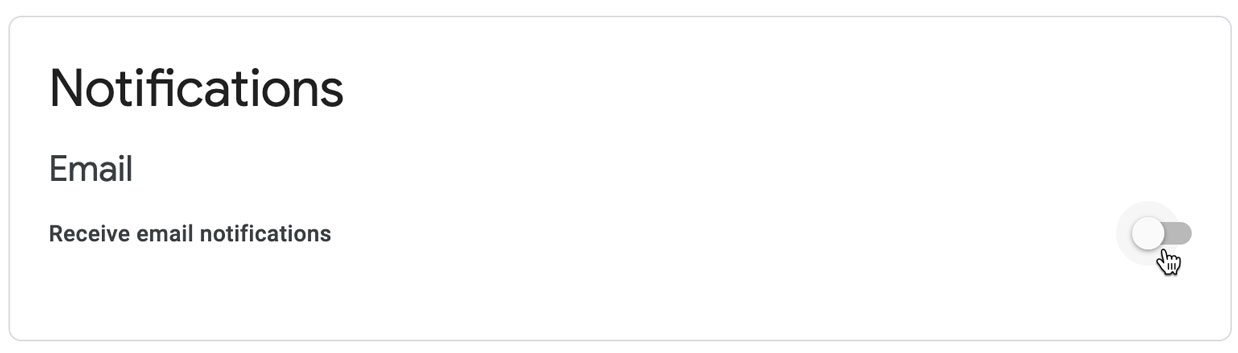
Navigate to the Notifications section. There are toggle switches next to each notification setting. Currently, all are switched on. This means that the teacher will receive all email notifications.
- If you do not want some of the email notifications, take a look at the list and see if switching some of them off would work for you.
- If you do not want email notifications for a particular class, click the drop-down arrow next to Class notifications. There you can switch off notifications for a specific class.

- If you do not want to receive any email notifications, switch off Receive email notifications.
By setting up notifications, you can adjust how many emails are sent to your inbox.
Creating assignments and materials
Google Classroom gives you the ability to create and assign work for your students, all without having to print anything. Questions, essays, worksheets, and readings can all be distributed online and made easily available to your class. If you haven’t created a class already, check out our Getting Started with Google Classroom lesson.
Watch the video below to learn more about creating assignments and materials in Google Classroom.
Creating an assignment
Whenever you want to create new assignments, questions, or material, you’ll need to navigate to the Classwork tab.

In this tab, you can create assignments and view all current and past assignments. To create an assignment, click the Create button, then select Assignment. You can also select Question if you’d like to pose a single question to your students, or Material if you simply want to post a reading, visual, or other supplementary material.

This will bring up the Assignment form. Google Classroom offers considerable flexibility and options when creating assignments.
Click the buttons in the interactive below to become familiar with the Assignment form.

Once you’ve completed the form and clicked Assign, your students will receive an email notification letting them know about the assignment.
Google Classroom takes all of your assignments and automatically adds them to your Google Calendar. From the Classwork tab, you can click Google Calendar to pull this up and get a better overall view of the timeline for your assignments’ due dates.

Using Google Docs with assignments
When creating an assignment, there may often be times when you want to attach a document from Google Docs. These can be helpful when providing lengthy instructions, study guides, and other material.
When attaching these types of files, you’ll want to make sure to choose the correct setting for how your students can interact with it. After attaching one to an assignment, you’ll find a drop-down menu with three options.

Let’s take a look at when you might want to use each of these:
- Students can view file: Use this option if the file is simply something you want your students to view but not make any changes to.
- Students can edit file: This option can be helpful if you’re providing a document you want your students to collaborate on or fill out collectively.
- Make a copy for each student: If you’re creating a worksheet or document that you want each student to complete individually, this option will create a separate copy of the same document for every student.
Using topics
On the Classwork tab, you can use topics to sort and group your assignments and material. To create a topic, click the Create button, then select Topic.

Topics can be helpful for organizing your content into the various units you teach throughout the year. You could also use it to separate your content by type, splitting it into homework, classwork, readings, and other topic areas.

Using Forms with Google Classroom
Google Forms is typically used to create surveys, sign-ups, feedback forms, and more. It also can be used to create quizzes that you can easily incorporate into Google Classroom. There’s a variety of question types you can use to make your own quizzes, and they feature an array of customizable settings.
Watch the video below to learn more about creating and sending forms to your students using Google Classroom.
Creating a quiz
To create a quiz, you’ll first need to create a basic form. We go over this in greater detail in our lesson on creating simple forms, but we’ll cover some of the basics below.
Navigate to the Google Forms homepage, then click the Blank icon.

Before writing questions and answers for your quiz, you’ll need to make some changes to the form’s settings. Click the Settings icon in the top-right corner.

Click the Quizzes tab and toggle the Make this a quiz switch. Turning this on will make several quiz options available that allow you to choose how your students will interact with your quiz.

Click the buttons in the interactive below to learn more about the various quiz settings.

Once you’ve chosen your desired settings, click Save. You can then name your quiz and start writing your questions. For more information on creating form questions, review our lesson on creating simple forms.
Selecting correct answers for your questions
For each question on your quiz, you’ll need to define the correct answers. To do this, click Answer Key.

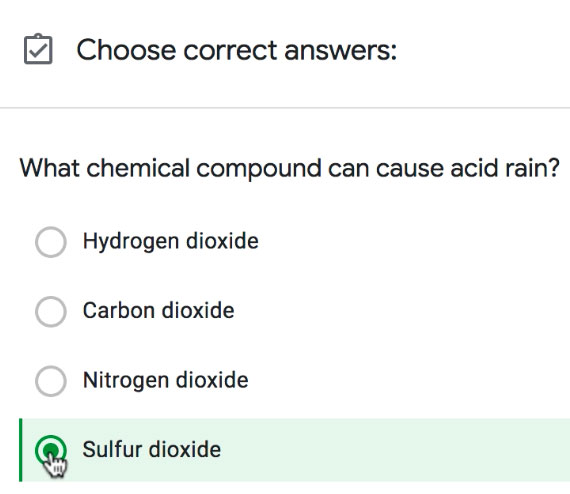
This screen will appear differently depending on the question type you’ve chosen. Let’s take a look at how to choose correct answers for several popular types of questions:
- With a multiple-choice or check-box question, simply select the correct answer(s) from the available choices.
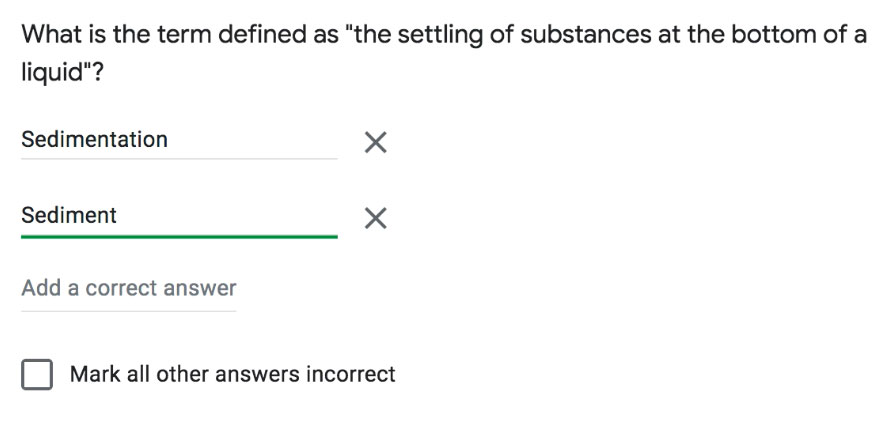
- For a short-answer question, type the answer in the Add a correct answer field. You can also add multiple correct answers if the wording may vary for a particular question. If you check off Mark all other answers incorrect, all answers that don’t match will automatically be marked incorrect. If you leave it unchecked, any answers that aren’t an exact match will be left for you to manually review and grade.
- Paragraph questions don’t offer the ability to add correct answers. Because they’re longer and require more analysis, you’ll need to read each individually and grade them on your own.
After choosing the correct answers, select how many points you’d like the question to be worth using the points field.

You also have the option of using answer feedback. This gives students feedback on certain questions, depending on whether they chose the correct answer. Click Add answer feedback and type the messages you’d like to appear for correct or incorrect answers.

Each question has a Required toggle switch. If you want students to answer the question, toggle on Required. A red asterisk will appear next to the quiz question to let them know that it is mandatory. If you want students to have the choice of answering the question, toggle off Required.

Once you’re satisfied with the question, you can preview it and give it a try to make sure everything’s correct. To do this, simply click the Preview icon in the top-right corner.

Adding sections to your quiz
Depending on the number of questions, you may want to separate your quiz into multiple sections. This will make it so that your questions are broken up across several pages instead of having them all appear on one page.
To do this, simply click the Add section icon in the toolbar on the side.

You can add questions to these sections by following the same instructions listed above. You can also move questions to other sections by dragging and dropping them using the icon shown below.

Adding quizzes to classes
Once you’ve finished creating your quiz, you’ll need to bring it over to your class. Much like how you can attach documents, links, and videos to your assignments, you can attach forms.
When creating an assignment, click the Google Drive icon in the lower-left corner.

Locate and select the quiz you’ve created, then click Add.

After you’ve sent the assignment with the quiz attached, your students will be able to complete it. You can access responses the same way you would with any Google Form
Grading and leaving feedback
After students submit assignments, you’ll be able to review and grade them. Google Classroom gives each assignment its own page, making it easy to grade and leave feedback for your students.
Watch the video below to learn more about grading and leaving feedback.
Viewing an individual assignment
To view an assignment, you have two options. Start by navigating to the Classwork tab. Click the assignment you want to grade, then click View Assignment.

Another option is to click the Grades tab. From there, you can open the assignment you want to grade.

Either option will take you to the Student Work page for that assignment. This is where you’ll be able to view each of your students’ submissions and grade them.
Click the buttons in the interactive below to learn more about the Student Work page.

Grading assignments from the Student Work page
One way to grade students’ assignments is on the Student Work page. Simply click the score next to any student’s name, then type the grade you’d like to give.

After grading the assignments, you can select the checkbox beside each student’s name and click Return. This will send the graded assignments back to the corresponding students.

Grading assignments with the grading tool
You can also grade an assignment using the grading tool found within each individual submission. First, you’ll need to click an assignment to open it.

On the right side of the screen, you’ll find a column featuring the grading tool. In the Grade field, you can type the grade you’d like to give. You can also leave feedback for students in the Private comments field.

Once you’ve finished grading an assignment and are ready to share it with that student, you can click the Return button. To view other options, you can click the drop-down arrow. The Return this submission option only returns one grade at a time. If you have graded multiple assignments, the Return multiple submissions option can help you save time by returning grades to more than one student.

A dialog box will ask you to confirm that you want to return the work to a certain number of students. Click Return.

Viewing the class’ grades as a whole
Under the Grades tab, you can see the grades for each assignment by student, along with the assignment’s average grade and the class’ overall average grade.

To see overall grades, you will need to turn on Overall grade calculation in the Class’ settings.

To see a particular student’s work, click on their name. You can see what they have turned in, what has been returned, and if they are missing assignments.

Google Classroom gives you the ability to export grades from assignments to Google Sheets. To export grades for assignments you’ve finished grading, go to any Student Work page, click the gear icon at the top-right, and select Copy all grades to Google Sheets.

Once you’ve created one of these spreadsheets, it’s important to note that it will not update automatically. Whenever you grade more assignments, you’ll need to export the grades again.

If you’re looking for a more detailed and customizable gradebook experience, there are plenty of third-party apps that work in conjunction with Google Classroom. You can find a list of them them on this page.
Communicating with students and parents
In addition to assigning and grading work, Google Classroom allows you to communicate with students via email. It’s also possible for parents and guardians to receive email summaries to keep them informed of current and upcoming events.
Watch the video below to learn how to communicate with students in Google Classroom.
Emailing your students
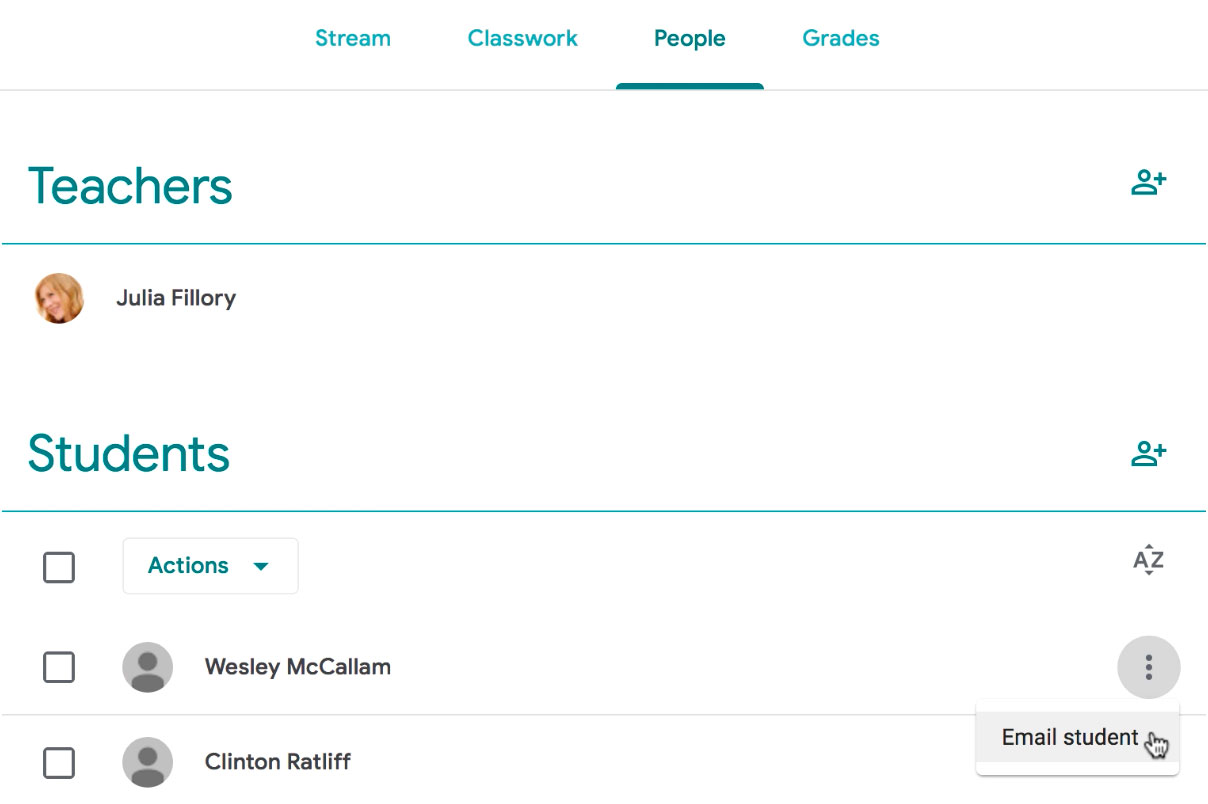
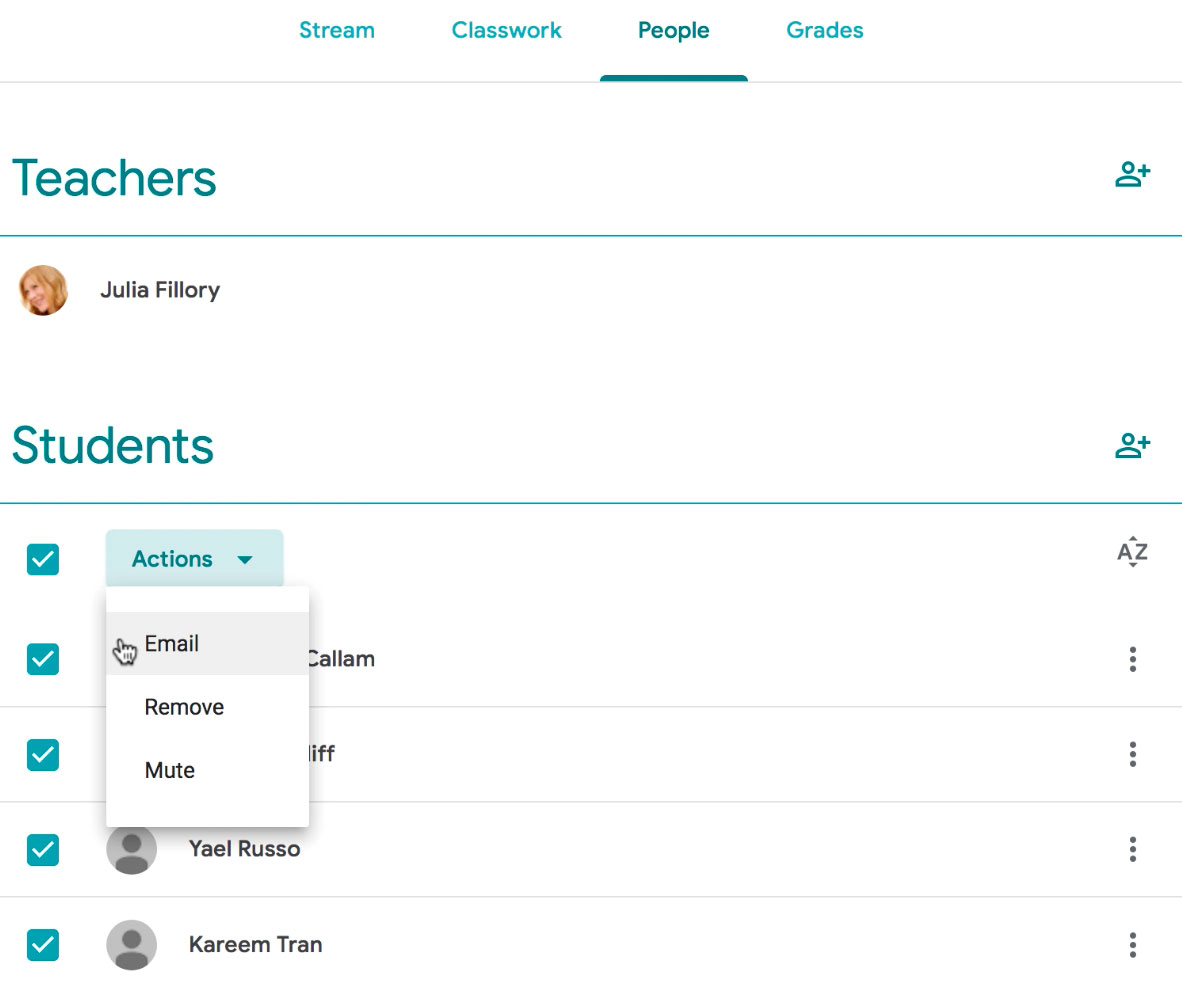
Google Classroom makes it easy to email your students, whether it’s a message to the entire class or one student in particular. Regardless of who you’d like to email, you’ll first need to navigate to the People tab.

You have several options here, depending on the people you’re emailing. Let’s take a look at a few possible examples:
- Emailing a single student: Find the student’s name, click the More button, and select Email student.
- Emailing multiple students: Check off the names of the students you’d like to email, then click Actions and select Email.
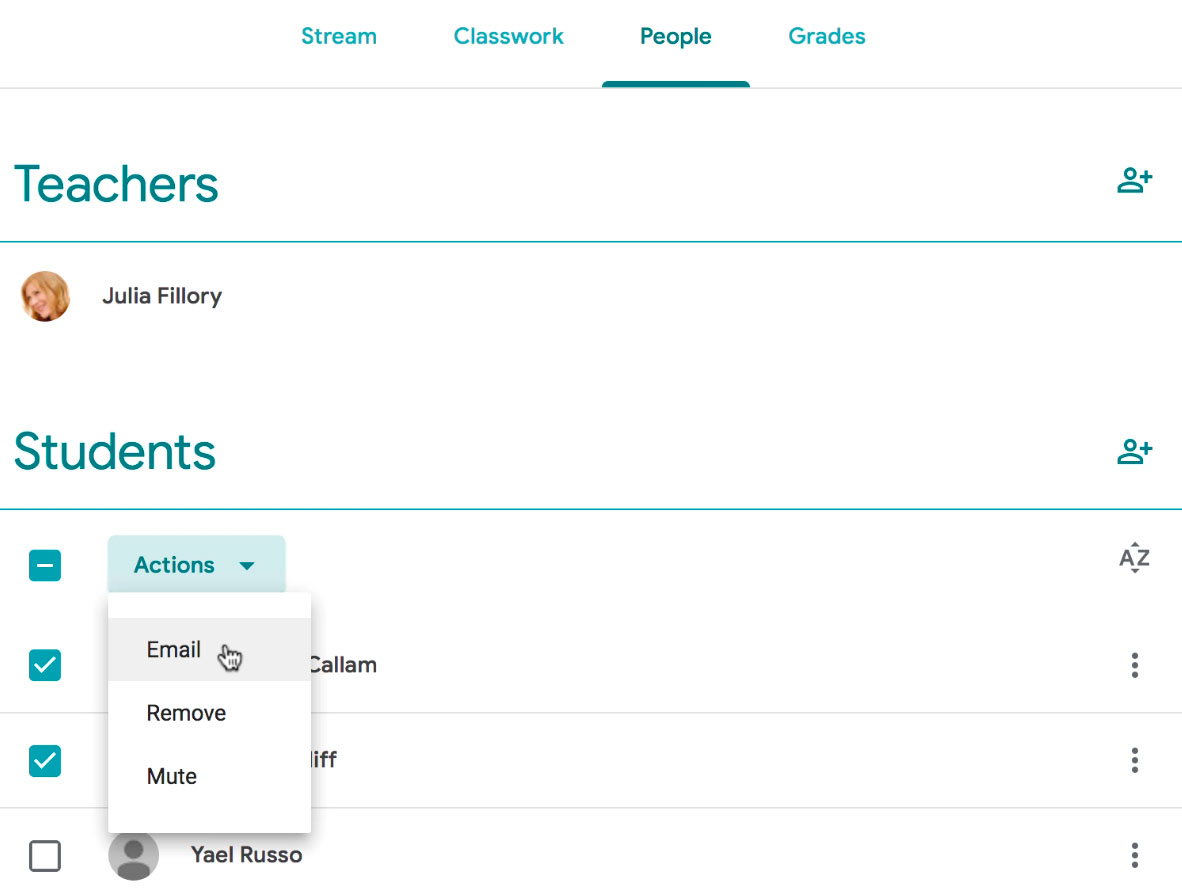
- Emailing the entire class: Check the box above the list of students to select all of them. Then click Actions and select Email.
Posting announcements
Instead of sending emails, you can post announcements to the class’ Stream. These are simply posts your students will view on the Stream when they sign in to Google Classroom. They can be helpful as reminders, notifications of upcoming events, or anything else you’d like to share with the class as a whole.
To post an announcement, navigate to the Stream tab, then click the field at the top of the stream that reads Share something with your class…

From here, you can type anything you want and include a link or attachment by clicking the Add button. Once you’re done, click Post.

Your message will post to the stream.

Class summaries for parents
It’s also possible for parents and guardians of your students to receive email summaries. These include missing work, upcoming work, and recent class activity. These summaries are generated automatically and cannot be customized with personal messages or additional content. Parents get to choose whether they receive these emails daily or weekly, and they have the option to unsubscribe as well.
Class summaries are only available when your students are using G Suite for Education school accounts. School administrators also must grant teachers access to manage these email summaries.
If your students are using G Suite for Education school accounts and you’d like to provide email summaries, you can learn how to do so here.
Credit: www.edu.gcfglobal.org