How to Use Meta Business Suite (Formerly Facebook Business Suite)
Businesses spend nearly 115 billion dollars on advertising across Meta (formerly Facebook) platforms.
Why? Because it works!
Plus, Meta offers great tools that make it easy to manage and track your business accounts.
Are you having issues managing your Facebook and Instagram marketing needs?
Failing to keep track of DMs and comments?
Do the multiple tabs for all your accounts and features like the Ad Manager drive you nuts?
Then you’re going to fall head over heels for Meta Business Suite, formerly called Facebook Business Suite.
It’s the platform’s newest creation, designed to iron out the time-sucking road bumps in social media management and make it easier for businesses to manage their Instagram and Meta profiles.
Below, I’ll cover everything you need to know about Meta Business Suite. We’ll unpack what it is, everything you can do with the tool, how it can benefit your business, and a quick walkthrough on how to set up your account.
What Is Meta Business Suite and How Does It Work?
Meta Business Suite is a free tool that allows you to manage your Facebook and Instagram accounts (including ads!) in one easy-to-use dashboard.
You can manage all accounts you own or administrate through the platform with various tools to make controlling your business’s social media presence much easier.
See How My Agency Can Drive Massive Amounts of Traffic to Your Website
- SEO – unlock massive amounts of SEO traffic. See real results.
- Content Marketing – our team creates epic content that will get shared, get links, and attract traffic.
- Paid Media – effective paid strategies with clear ROI.
The best part? It’s free and available on mobile and desktop.
With nearly 3 billion monthly active users on Facebook alone, this tool is one of the best ways to improve your social reach, build brand awareness, and make sales.
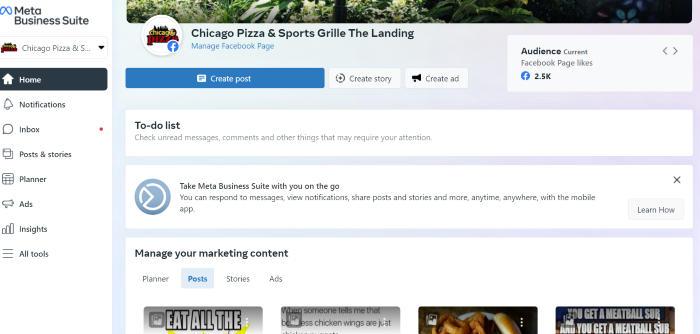
All you need to do is link up your accounts, and you’ll have instant access to an overview dashboard of your Facebook Pages and Instagram accounts.
You’ll be able to:
- create a to-do list of notifications to manage
- check insights on your performance and audience growth
- create or see recent posts or stories
- create or manage recent ads
- see your content calendar
- view content inspiration
- communicate with an inbox for Facebook and Instagram DMs and comments
- access the Commerce Manager
- check Business Suite updates
That’s only the tip of the iceberg.
There’s an entire “more tools” section with other features to play around with, including:
- appointments
- ad manager
- events manager
- instant forms
- media library
Meta Business Suite vs. Facebook Business Manager
Before Facebook became Meta, they offered both Facebook Business Suite and Facebook Business Manager. Both options are still offered under Meta.
The Business Manager is a backend tool used to share or limit access to your business accounts by assigning one of six different “roles” to those with access to your accounts.
The Business Suite offers front-end management, like merging notifications, scheduling posts, and managing your inbox.
If you’re used to Facebook Business Manager, you’ll love Meta Business Suite! It allows you to combine and streamline your activity across the Meta social media and messenger platforms.
Leveraging Meta Business Suite Insights
Meta Business Suite makes it easy to track your business accounts and campaigns across the Meta social and messenger platforms.
Here are some of the insights Meta Business Suite provides and how to use them:
- Ad spend: You can track your ad spend across all Meta platforms. Based on how well you’re performing, you can adjust your spend accordingly. For example, if you’re spending a lot on Instagram ads but see via other insights that the ads aren’t performing well, you can redirect your budget towards the Meta platforms you’re more successful on.
- Engagement: Meta Business Suite lets you see your organic and boosted content engagement. You can see what content performs best and use that to inform your future strategies and the content you publish on social media.
- Audience demographics: With Business Suite, you can see data about the users who interact with your profile and content. For example, you can see where they’re from, their other interests, their age, and more. You can use this information to continue creating content that targets your existing users, or adjust your strategies if your content isn’t reaching the right audience.
Understanding Facebook insights can help you plan a better Facebook strategy, so take the time to explore this tool.
Using the Meta Business Suite App
The Meta Business Suite mobile app allows you to manage your business accounts from your mobile device.
Everything you can do on desktop, you can also do on mobile. You can monitor your account activity, manage your inbox, and even get audience insights.
How to Use Meta Business Suite
Before you can start streamlining your social media management with Meta Business Suite, you’ll need to get everything set up. If you already have an account.
Step 1: Create a Facebook Business Account
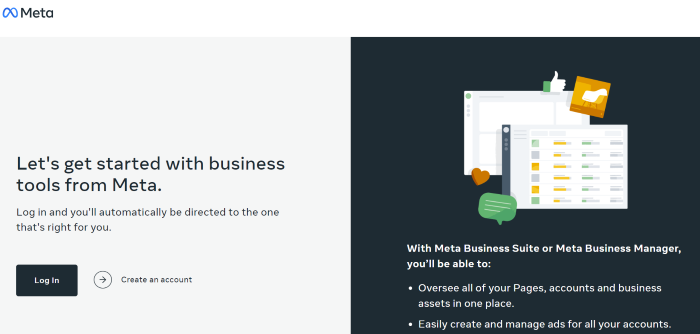
Go to the log-in page and select “Create an Account.” You’ll be prompted to log in to your Facebook account or create a new account.
Step 2: Fill in Your Contact Information
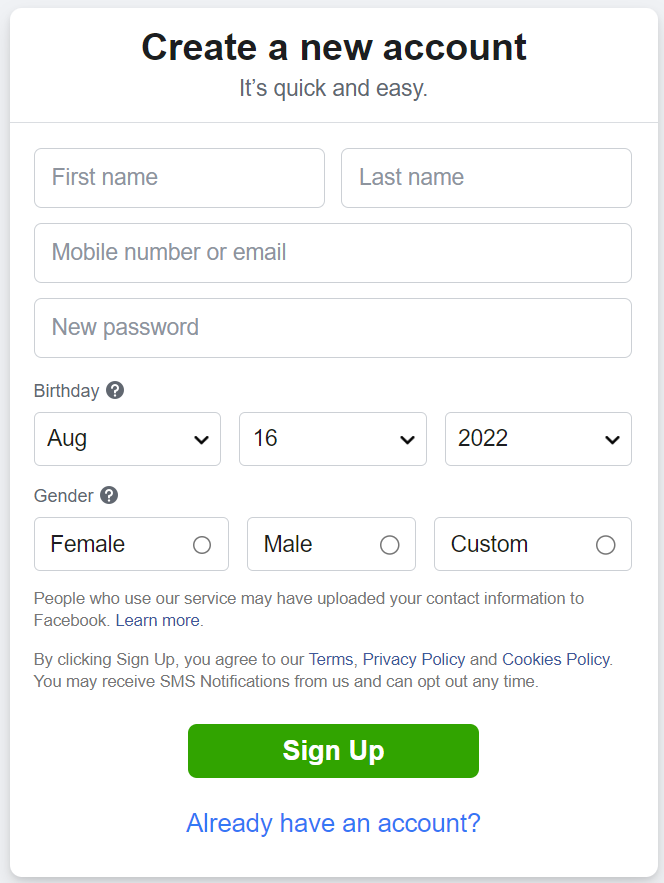
Enter your full name, business email address, birthday, phone number, and password. This information won’t be shared with your followers. Facebook will only use it to contact you.
Step 3: Select Your Facebook and Instagram Accounts
The Facebook and Instagram accounts you own are available for you to claim. If you’re managing an account someone else owns, you won’t be able to select it.
To select an Instagram account, it needs to be converted to a business or creator account. If you try to select a personal account, Facebook will ask you to switch before continuing the setup process.
Step 4: Add People to Your Business Account
Next, select your page admins. Enter their email address and assign each contact as an employee (limited access) or business admin (full access).
If you’re running your accounts solo, you can skip this step.
Step 5: Review Your Business Account
When you’re happy with your selection and who has access to your Business Suite, click on “Confirm.” Facebook will then take you to your dashboard overview, and you can start using all the tools inside the platform.
Tools to Use in Meta Business Suite
Curious about the tools inside Meta Business Suite? Let’s take a deep dive and look at what you can do with the platform and how it can benefit your business.
Monitor Your Inbox
Are comments one of your biggest time suckers? Do you constantly find yourself hopping between apps on your phone or getting inundated with notifications on your desktop?
According to HubSpot, the average small business owner spends more than 6 hours per week managing social media.
With the inbox tool in Meta Business Suite, you can drastically reduce that time by managing your Instagram and Facebook comments in one place.
Pop the kettle on, make some coffee, block out 30 minutes in your calendar and respond to everything at once.
What about direct messages (DMs)? You’ll find that here too.
Got the Facebook chat plugin on your website? You can manage all your messages here as well.
Sick of replying to the same question every single day? Business Suite lets you create automated replies for your frequently asked questions.
You can also manage conversations with specific people and create labels, giving it a bit of a CRM feel.
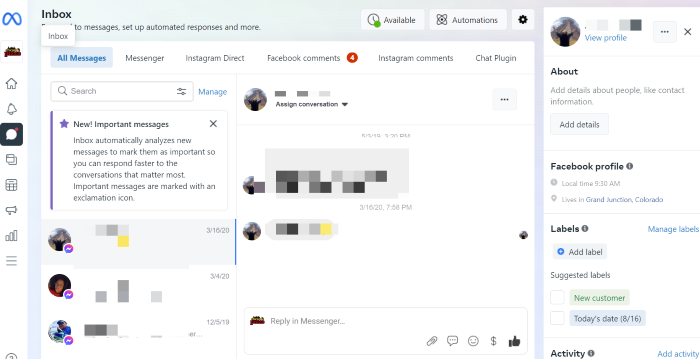
How’s that for efficiency?
Explore Meta Insights
Many social media tools exist for Facebook and Instagram analytics, but few compare the platform’s built-in option.
With Business Suite, you can see the latest statistics for all your accounts.
Gone are the days of toggling between the different apps or going in and out of individual posts.
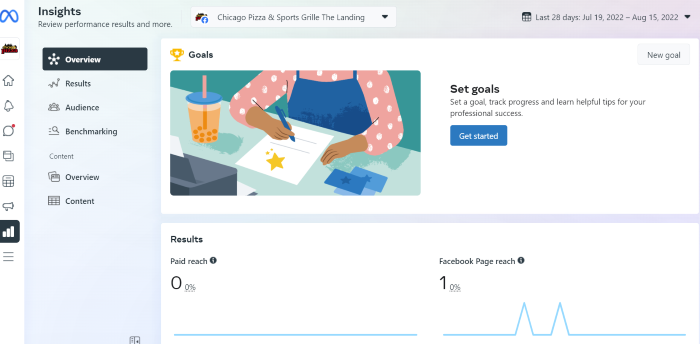
On the Insights dashboard, you can see an overview of how your content is performing over a specific period, and sort your posts by:
- reach
- likes and reactions
- comments
- shares
- results
- cost per result
- link clicks
- recent content
One of the most interesting features of Insights is the Audience section. It breaks down your current audience for both platforms, and you can see at a glance:
- age and gender
- towns and cities
- top countries
There’s also a potential audience tab. It details your estimated audience size if you run an ad and the top pages liked by your potential audience.
You can also set goals, view overall insights, and manage your content.
Create Posts and Stories
Are you using post-creation apps like Later or Planoly? Business Suite sets itself up as a rival by giving you the ability to create your posts and stories in one place and schedule each one out.
That’s not all.
If you go to the Planner section on your dashboard, you’ll see a calendar view of your past and upcoming posts.
You’ll see suggested moments or events to address in the lower right corner of the main posts dashboard, such as back to school and other holidays.
Click on “content type,” and you can filter to see specific types of content, such as posts, stories, or ads.
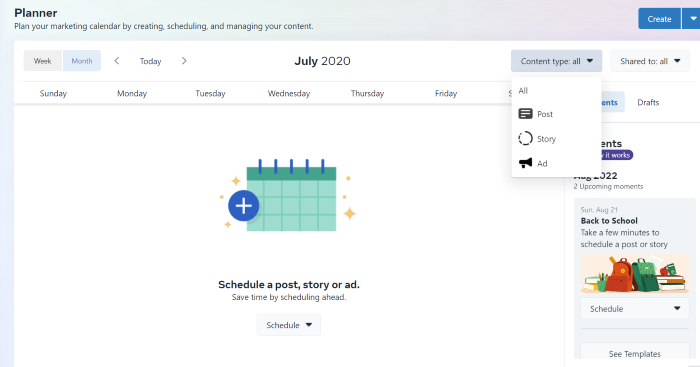
Facebook also recommends a timeslot of when your audience is most online.
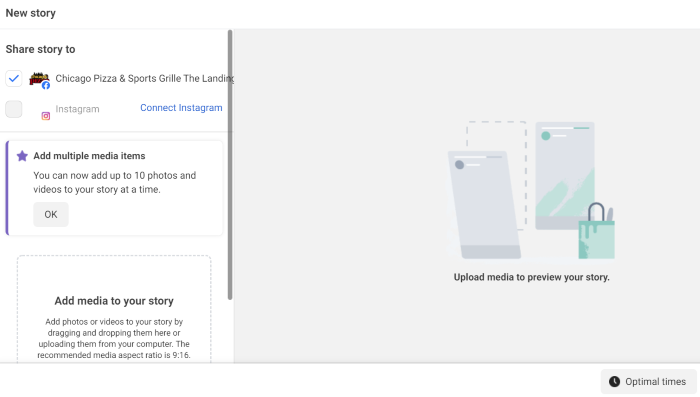
Click on create, and you can start creating a new post or story.
The hashtag tool is one of my favorite features in the “New Post” box. It shows you which hashtags are trending, the number of posts using a tag, and lets you save your favorites for later.
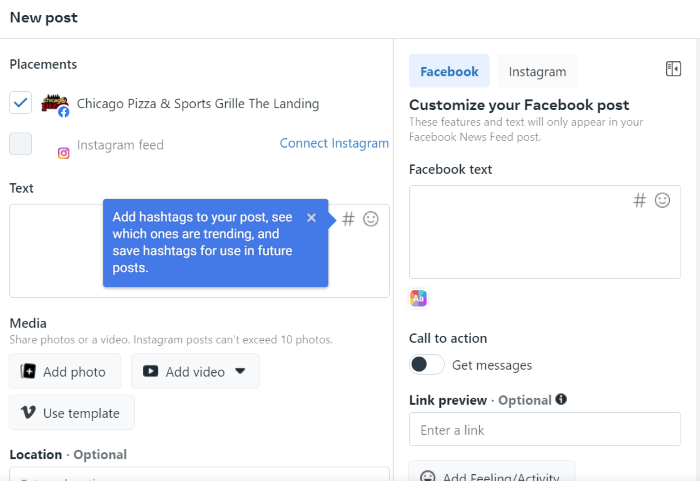
Plus, it shows hashtag results for each platform and gives you recommendations based on what you’ve already selected. You can also add a Feeling/activity, create A/B tests, and preview your posts.
While in create mode, you can put together your Instagram and Facebook posts at the same time. Switch between the different tabs; you can see exactly how your post will look on the two platforms.
Stories work the same. Upload up to 10 photos or videos at once and schedule each one out when you’re done.
Create Facebook and Instagram Ads
Don’t want to have another tab open for Ad Manager? You can keep track of your ad performance and create ads from Meta Business Suite.
It’s another time-saver and allows you to see how you’re tracking towards goals.
Click on the “Ad” icon in the left sidebar (it looks like a megaphone), and you’ll see:
- reach
- post engagement
- link clicks
- page likes
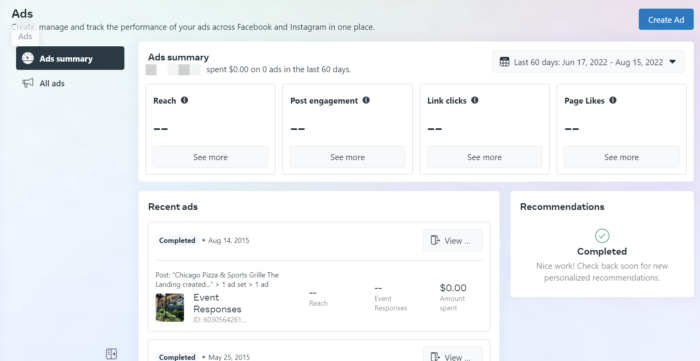
Switch between the different filter views to see your results over the last 90, 60, 30, and 7 days.
Click on the blue “Create Ad” button in the top right-hand corner to create an ad. A pop-up will load and take you through a step-by-step process for creating a creative that converts.
First, you’ll select your ad goal. You can choose from:
- automated ads
- get more leads
- boost a post
- boost an Instagram post
- promote a page
- get more website visitors
- get more messages
Next, start designing your ad creative. You’ll see a live preview as you adjust your text and media.
Turn on automatic adjustments if you want Facebook to tweak your ad for each viewer. For example, the platform might adjust the brightness or show the original aspect ratio if it thinks the ad will perform better.
Scroll down to select your audience or create a new one, placements, and set your campaign budget and duration.
When you’re done, click on “Promote Now” for your ad to go into review.
Create Appointments for Your Business
Remember those extra options I spoke about earlier?
One of the most important features of an online business is the appointment scheduler.
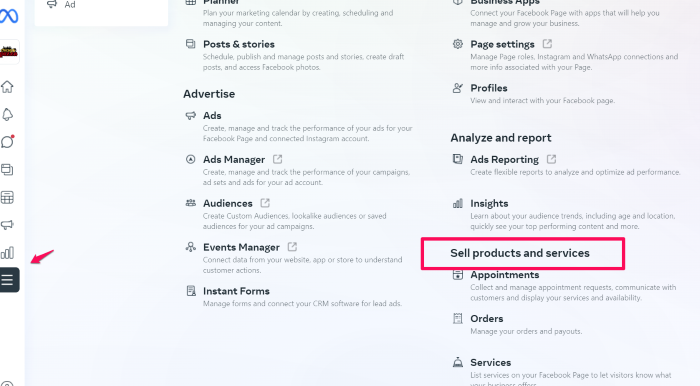
Click on the “All Tools” button in the left sidebar, then look for “Sell products and services.”
Here, you can book appointments, manage orders, and list services on your page.
If you’re running a service-based business, take advantage of Facebook’s capabilities and empower your audience to book directly through the platform.
When people don’t need to log onto another site to complete the process, you’re removing an extra step and making it that much easier to close a sale.
The result? A boost in your bottom line!
Generate Leads With Instant Forms
Does your business rely heavily on lead generation? Meta’s Instant Forms can help you leverage Facebook and Instagram to drive more leads.
What are Instant Forms? Think of it as a mini CRM system. When you create an ad and set your objective to find leads, you can create custom forms users can fill out without leaving the platform.
Again, you’re removing the obstacle of trying to get them to go from one website to another. Thus, improving your chances of someone filling out the form and requesting a callback.
With Business Suite, you can manage your forms and set up the CRM system.
When you create a form, Facebook offers different options depending on your lead generation goal.
For example, you can create a “more volume” form (a quick option) or a “higher intent” (adds an extra step for users to review their information before submitting).
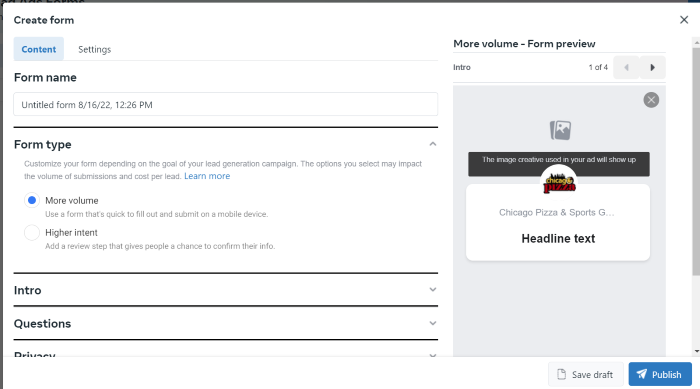
To access this tool, head to “All tools” and then look for Advertise. You’ll see an option for “Instant forms.”
Credit: neilpatel.com

